Citron melon, or: how I succumbed to gardener’s greed

Citron melon 1

In my early gardening days, like many other novice gardeners, I wanted to grow just about everything I saw in seed catalogs and nurseries. Over time, realism kicked in and I learned to respect the limits set by time, space, climate, and money. In other words, I managed my gardener’s greed.

Or so I thought.

Then, last November, I read about citron melon jam in Mimi Thorisson’s blog Manger, and I knew I wanted those melons in my garden. It intrigued me that the melons are harvested in the fall, long after the other melons are gone, and that they are not palatable raw. I’ve been to Médoc near Bordeaux, France, where, as Mimi writes “at this time of the year, local Médocains are all preparing the melon d’Espagne [citron melon] jam” however, I had neither heard of the melon nor the jam before.

I could not find the seeds in the United States but came across A Gardener’s Table (funny coincidence!), a blog by food writer Linda Ziedrich. She had written about growing citron melon so I sent her an email asking where she got the seeds. The seeds are not commercially available but she offered to mail me some of the ones she had saved. I wanted to reciprocate but did not have any unusual seeds for her. Instead I asked if she would like some of my yearly allotment of dark chocolate that my mother in Germany had just sent me. Seeds then traveled from the West Coast to the East Coast, and chocolate in the other direction.

My exchange with Linda did not stop after I received the beautiful dark red citron melon seeds in the mail. We’ve had a lively and most interesting email dialog since, about a variety of gardening and food preservation topics, and last summer Linda and I conducted experiments with different pectin products for jam and both blogged about it (see my blog Spoonfuls of Germany). Linda’s two books, The Joy of Jams, Jellies, and other Preserves, and The Joy of Pickling have become my first references to read up on the subject and look for recipe inspirations when I get swamped with produce from the garden.

2012 had been a terrible year in my garden for all members of the cucumber family. I had almost none or no cucumbers, zucchini (yes, that is possible), melons, and winter squash. This year I decided to overplant everything, including the citron melons. My goal was to have one melon so at least I would know how it tastes.

Almost all the citron melon seeds germinated. I planted five seedlings and gave the rest away. Citron melons must love the soil and climate on our Pennsylvania hilltop. They grew and grew and grew. After they had set fruit and I spotted about a dozen tiny melons I started pruning the vines so that the plants would put all their energy in the fruit that was already there. I had to prune them many more times but they just kept growing, over the fence and down the slope if I had let them.

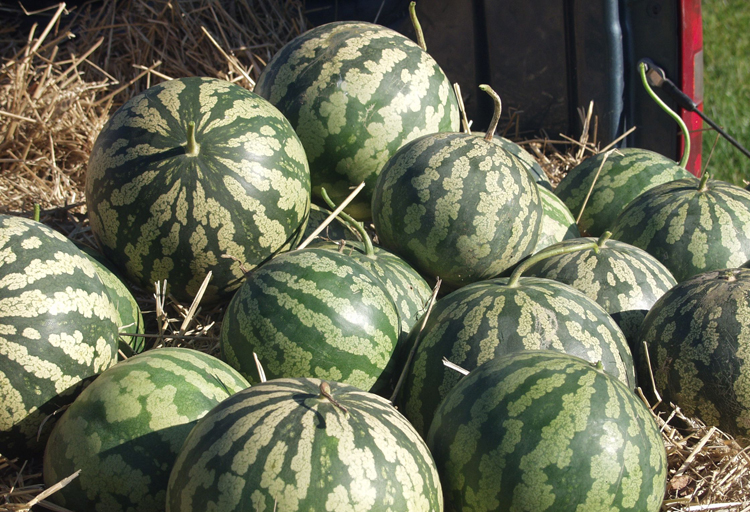
From the photos the citron melons looked about the same size as the Charentais French breakfast melons that I like to grow. To keep those off the ground, I put each melon in a piece of pantyhose and suspend it from a trellis or the garden fence. Well, the citron melons grew so large that the pantyhose burst. And I had to take the melons off the fence, otherwise it would have collapsed.

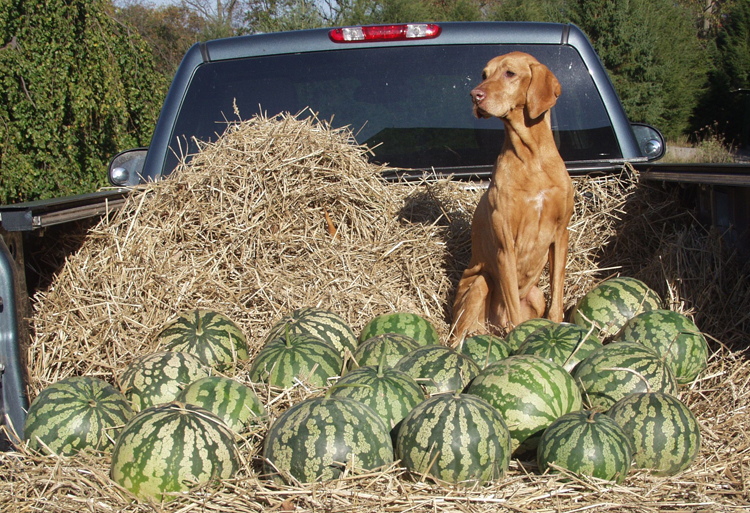
Today was harvest day. I had to recruit my husband’s help to bring the 22 heavy melons up from the garden. Several weeks ago, when I realized I would have many more melons than I could possibly handle, I started lining up a group of testers, all experienced cooks and/or passionate canners, unafraid and with a healthy dose of curiosity to try something new.

Among the testers is Pat Taylor whom I met at an event of my Master Gardener group in August. She mentioned being into colonial cooking and I remembered reading somewhere that citron melons were used in those days. Pat did research about citron melons, which are also called “jam melons” or “pie melons”, and found recipes like Citron Cream in The Virginia Housewife Or, Methodical Cook by Mary Randolph, whose brother, she explained to me, was married to Jefferson’s daughter. Little did I know that I was in for a history lesson, too!

Of course I hope that the jam or whatever the citron melons will become in the end, is going to be tasty. And if they don’t taste that great, I won’t be upset. Just explaining to everyone who came to my garden this summer, “No, these are not watermelons,” and telling the story, and connecting with people I would have never met otherwise, makes it a fun experience already.

To be continued.

Citron melon 2

Photos by Ted Rosen

Gluten-free and paperless

Brown Rice Farina Crackers

The garden is winding down and there is nothing at the moment that would lend itself for a quick and easy vegan potluck dish. So for phoebe’s pure food soiree tonight, I made two batches of Brown Rice Farina Rice Crackers. I came up with the recipe when I had too much brown rice farina in the pantry, and was looking for a less salty and low-cost alternative to high-quality whole-wheat crackers from the grocery store. These crackers are gluten-free.

And paperless? Well, at the potluck + guest speaker event, everybody brings along a copy of their recipe. In the past I usually had either too many copies or too few, therefore this time I am going paperless, and whoever would like the recipe can find it here.

The potluck is an hour away but it is well worth the drive. Phoebe Canakis is a real mover and shaker about eating local, seasonal, organic wholesome foods. I met her in the spring of 2012 at a mozzarella-making class she hosted for the food website food 52. Yep, the Internet is not only good for dating, you can make new friends too!

Phoebe always has so many exciting things going on that I sometimes feel I can barely stay up to date. What I know is that the fall issue of her ad-free online magazine is coming out soon.

And, on Food Day, October 24, a nationwide celebration 
and a movement for healthy,
affordable, and sustainable food, we’ll be together at Roaring Brook Market in Lancaster, PA, to show how to cook easy, healthy dishes with local and seasonal foods (for details see here).

Brown Rice Farina Crackers

1 cup creamy brown rice farina

1¼ cup water

1 teaspoon salt

2 tablespoons canola oil

Seeds, coarse salt, grated parmesan etc. as desired

1. Preheat the oven to 425 degrees F. Line a large baking sheet or jellyroll pan with parchment paper or a baking mat.

2. Mix all ingredients in a small saucepan. Bring to a boil over medium heat, stirring constantly. Cook until it forms a thick paste that detaches from the bottom of the pan.

3. Using a greased rubber spatula, spread the mix onto the prepared baking sheet as thinly and evenly as possible, and patch up any tears.

4. Sprinkle with seeds etc. of your choice. Using a small pastry wheel, cut into cracker-size squares or rectangles.

5. Bake on the medium rack in the preheated oven for 30 minutes, or until lightly browned and crisp. Leave crackers on the baking sheet until cool enough to handle, then break them apart (usually they separate on their own during baking) and cool completely on a wire rack. Store in an airtight container.

Makes 30-40 crackers

Photo by Ted Rosen


Potato gold

Fingerling potatoes

Digging potatoes from the garden feels like digging gold to me, especially because my first attempt at growing fingerling potatoes several years ago was a complete failure. At least we have a good laugh about it every time we talk about it, or tell the story.

The potato vines were starting to wilt, signaling the approach of harvest time, when I realized that we did not have a good place to store them, such as a root cellar, or a cold but frost-free basement or shed. So I asked friends, owners of the local winery, whether they let me store the potatoes in one of their cellars.

They showed me around and asked how many potatoes I expected to harvest. I had no clue but thought that a corner in one of the cellars would be sufficient to store a couple of crates.

One of the following afternoons, I thought I would start digging a few plants for a test. All I could find was a potato or two. I dug until I hit bedrock. Nothing. The same thing with the next potato plant. And the next. And the next… At the end, I had a tiny basket of potatoes, barely enough for a meal.

I left the basket outside by the garage door and went inside. Shortly afterwards my husband came home. “So you started digging the potatoes?” he asked. “No, that’s it, that is all the harvest.” He looked at me in disbelief, then at the basket, at me again, then stood by the garage laughing and laughing.

The next day I had to call the winery saying there was no need for storage.

I never wanted to try potatoes again but this year I gave it another shot. Again, I planted fingerling potatoes because I cannot buy them locally grown, and they are just delicious.

I don’t know whether it was the variety, or the meticulous hilling, or the weather, or the addition of a good amount of organic fertilizer, or the straw I put around the plants to fend off insects (thank you, Troy from Hope Hill Lavender Farm, for the tip), or all of the above. Fact is: it has been a real and rich harvest!

The potatoes are larger than fingerlings usually are because I leave them in the ground and dig them as I need them for cooking. I estimate that they will be all eaten by the time the frost comes. As the plants have totally wilted and shriveled I have placed a marker where each plant was so I can find it.

The potatoes are still so tender that you can eat them with their skins. Last night we had them with sage butter.

Guard owl and green harissa

Guard owl

It is the nature of gardening that after you have solved one problem the next challenge already lurks around the corner. After we moved the elderberry patch to a new location with moister soil last fall, the bushes are thriving. They developed many blossoms, albeit unusually late in the season, and some of them are still flowering.

ElderberriesThe birds would be just as happy about the elderberries as I am so the next question was how to protect them. We looked into bird netting and quickly dismissed the idea as too involved and too expensive. Then I remembered the plastic owl we had not used in years. So up on a tall stick it went. To give it more weight and make it sway more in the wind, my husband filled it with insulation foam.

If the birds won’t get used to the sight of the owl by the time the elderberries ripen, I am slightly optimistic that we will have elderberries this year!

Green bell peppers are an unwanted by-product from my garden. I do not like them and they only land in my kitchen when a stem breaks off, or when I harvest all of them before the first frost, regardless of their color. I have not been very successful in ripening peppers in a brown paper bag or cardboard box; they always soften before turning orange or red.

Yes, I do not like green bell peppers but that does not mean I would ever dump them on the compost. I usually freeze them, hoping that I will eventually find a recipe that uses lots of green peppers. The only recipe I make on a regular basis is Black Bean Soup with Cilantro, however that is only one green pepper down. I have looked for recipes using lots of green peppers but they always ask for so many other ingredients I do not have at hand that making those recipes would defeat the purpose.

Cleaning out the freezer the other day left me with two large bags of green peppers from last year. They had to go, with minimum effort and other ingredients. I decided to try my hands on some sort of mild harissa, hoping for a miraculous green pepper metamorphosis. Worst thing that could happen would be to throw them out after all.

A few hours later I had three jars of a smooth tasty olive-green spread for sandwiches or crackers. A generous amount of ground coriander and caraway gives it a distinct “Tunisian” flavor. And I was able to use up some leftover jalapeños in the process, too!

Green harissa

I am not sure my late Tunisian grandmother would call this a harissa but she was a recycler herself so she would understand.

Green Harissa

2.5 pounds cored and seeded green bell peppers

12 garlic cloves, chopped

2 teaspoons ground coriander

2 teaspoons ground cumin

5 cored and seeded jalapeños, to taste

1 teaspoon chili powder

2 teaspoons salt

½ cup olive oil, more for covering

1. Preheat the oven to 350 degrees Fahrenheit.

2. Place all ingredients in a large cast-iron Dutch oven. Cook in the preheated oven for 2 to 3 hours until the liquid has been absorbed and the peppers are mushy, turning once in a while at the beginning, and more often towards the end.

3. Puree in the food processor or with a stick blender. Fill into sterilized jars with screw-top lids and pour a bit of olive oil on top. Keep refrigerated and use within 2 to 3 weeks.

Makes 2 to 3 medium jars